The Antimalware Service Executable process plays an essential role in the Windows Defender Service that comes bundled with Windows 10 (and, despite the similarities in name, is entirely unrelated to Emsisoft Anti-Malware!). However, these programs are famed for consuming far more than their fair share of the CPU processing power and can even drag the speed of your computer to a standstill.
If you’re using Windows Defender and have noticed high CPU usage for long periods, you’ll be happy to know that it can be quickly resolved.
This article outlines a few simple steps that you can take to prevent your computer’s Antimalware Service Executable from hogging its resources and causing your computer to crash.
In today’s digital age, no business can afford to ignore the need for data protection. Servers are the backbone of any business infrastructure, storing vital information and running critical applications. Unfortunately, server crashes, cyberattacks, or natural disasters can lead to catastrophic data loss if there’s no backup in place.
That’s where AOMEI Cyber Backup comes in. This enterprise Windows backup software brings enhanced features, including cloud integration, flexible scheduling, centralized management, and advanced security. designed to protect your Windows Server—whether it’s running on a physical machine or a virtual platform—without costing you a dime.
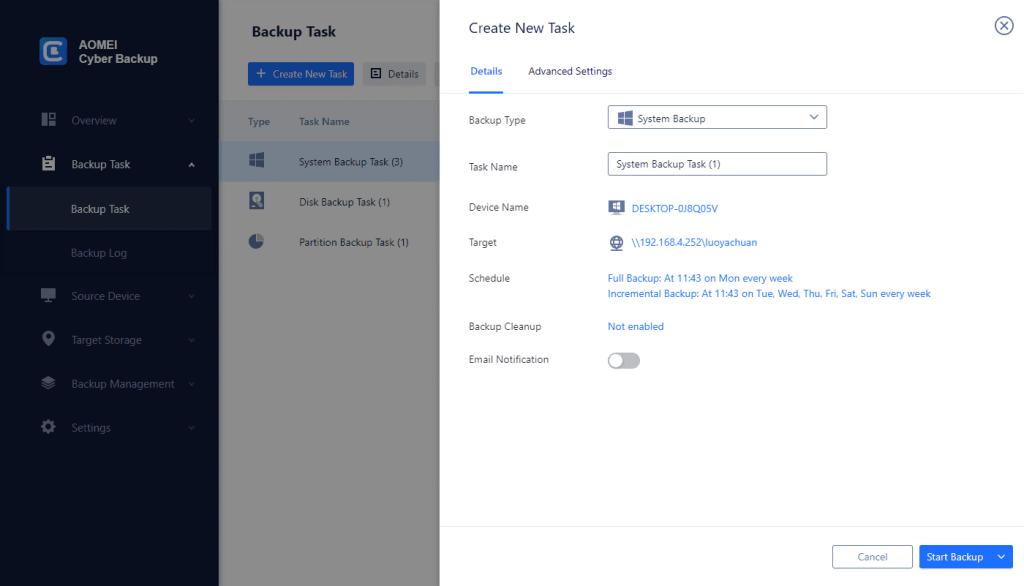
How to Back Up Windows Server Using AOMEI Cyber Backup?
Step 1: Install AOMEI Cyber Backup
First, download and install AOMEI Cyber Backup. It works on both physical and virtual platforms, such as Hyper-V and VMware environments.
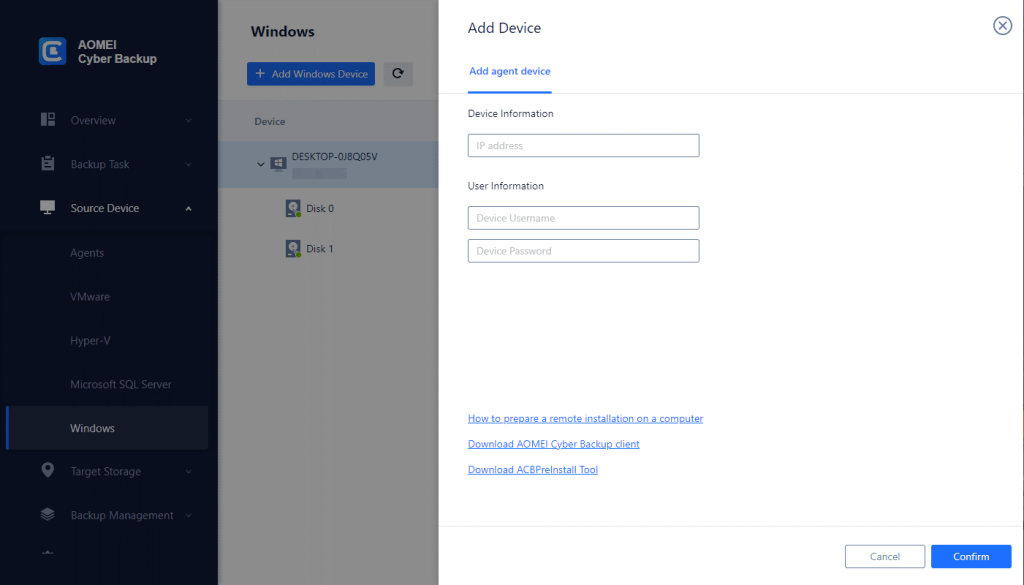
Step 2: Add Your Windows Server
Open the AOMEI Cyber Backup interface, and go to Source Device. Select Windows, then click Add Device. Enter your server’s IP address and login credentials, and hit Confirm.
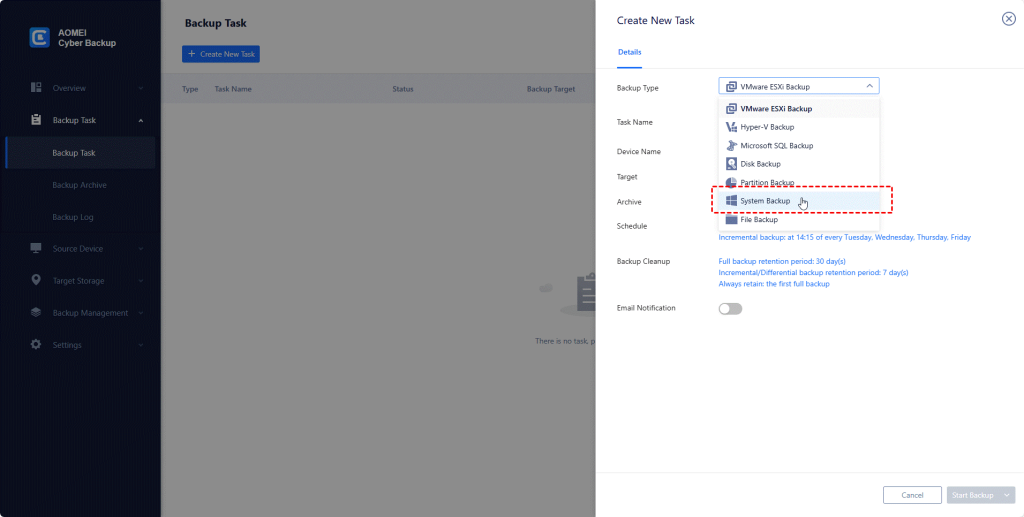
Step 3: Create a Backup Task
Now, you’re ready to create your backup task: Choose Backup Type: You can select from several backup types:
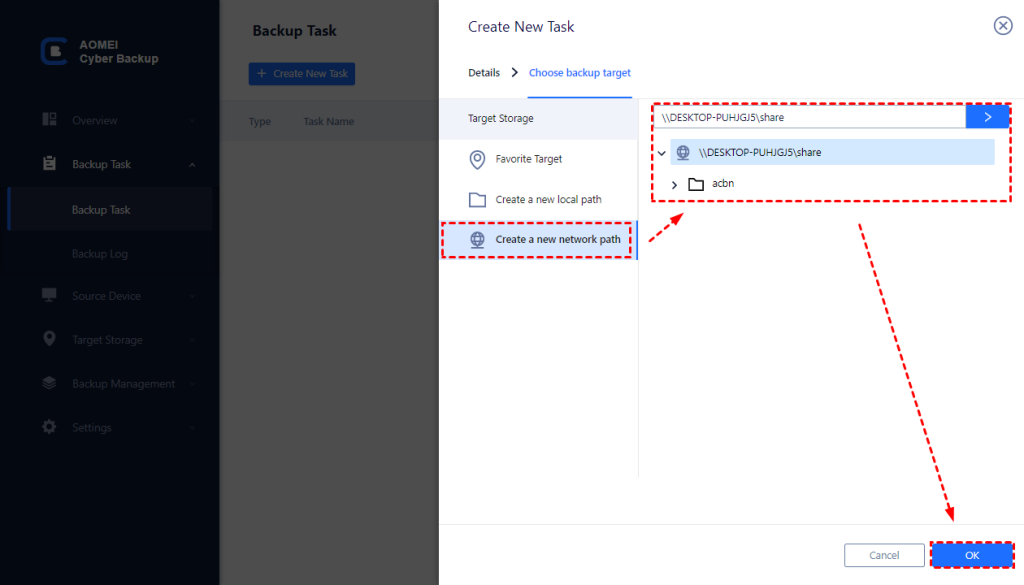
Choose Backup Destination: Select where you’d like to store the backup. You can back up to local storage, network drives, or cloud services (such as Amazon S3).
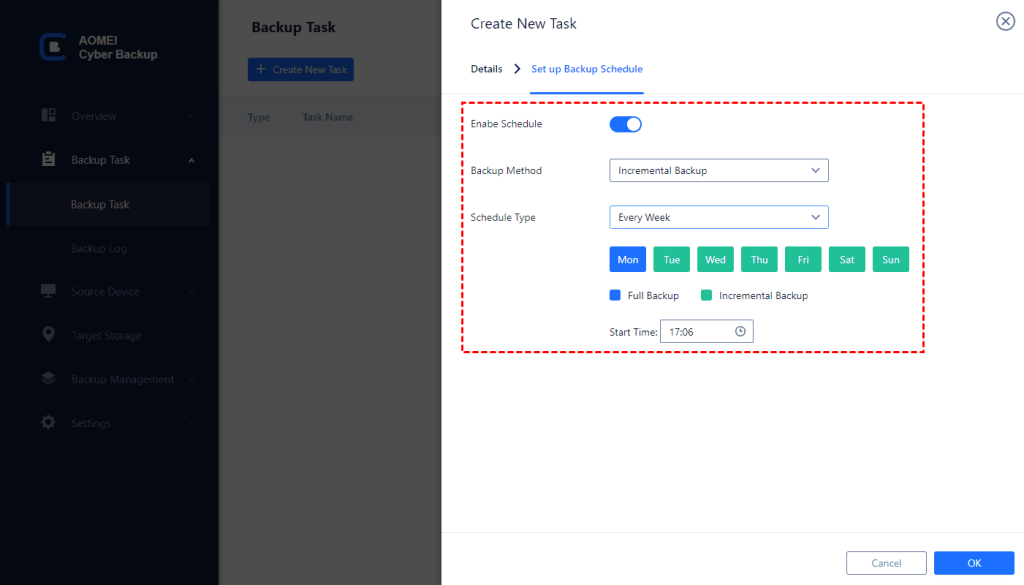
Set Backup Schedule: Select how often you’d like to back up your data. You can schedule it for daily, weekly, or monthly backups, and choose between full, incremental, or differential backups.
Start Backup: Once everything is set, click Start Backup to begin the process. You can either run the backup immediately or add it to your schedule for automatic execution.
Protecting your server data is a vital part of maintaining business continuity, and AOMEI Cyber Backup makes it easier than ever. Whether you’re using a physical Windows Server or running virtual machines, AOMEI Cyber Backup offers a reliable and secure way to back up your system.
What is the msmpeng.exe Antimalware Service Executable?
Do you use Windows Defender to protect your system? If so, open the Windows Task Manager (Ctrl + Shift + Esc or Start Menu > Task Manager), scroll down the list of background processes, and you will find a method called Antimalware Service Executable along with its associated file msmpeng.exe.
Windows Defender continuously monitors your computer for threats and provides real-time protection against malware and cyberattacks through this process. But at the same time, disproportionately high CPU usage can also result.
Windows Defender’s Full Scan feature may also be responsible for slowing down your system. It runs a comprehensive check on all files on your computer. A Full Scan uses a lot of processing power and isn’t afraid to use whatever processing power your system has to offer; you may experience lags, delays, and other effects when it’s running.
Windows Defender consumes more system resources than the rest of the antivirus programs when it runs a scan, as is normal for antivirus programs. It is known to use excessive CPU for more extended periods and carry out scans right when you wake up the computer to send an email or check a website quickly.
Even though this can be frustrating, you should not disable Windows Defender without installing another IT security solution. In the end, your computer is probably the only thing standing between you and the bad guys! Follow these steps to prevent the issue from happening again: Let the program do its job, deal with any threats, and follow the instructions below.
Change Windows Defender’s scheduling options
A full scan runs by Windows Defender usually causes the high memory usage associated with Antimalware Service Executable. You might not notice the drain on your CPU when the scans take place at a time when you’re less likely to feel it.
- Open the Start menu, enter the task scheduler, and click the top result to launch the program.
- Click the Task Scheduler Library link in the navigation pane on the left. Access the following file: Library/Microsoft/Windows/Windows Defender.
- Click the Windows Defender Scheduled Scan button in the middle pane of the Windows Defender folder once you’ve opened it.
- The Conditions tab should be clicked, then all options should be unchecked. This will clear your scheduled scans.
- We can schedule some new scans in a way that lessens the impact on your computer’s performance, but we do need to schedule some new scans to protect your computer. Double-click Windows Defender Scheduled Scan, choose the Triggers tab, and click New.
- Create a new scan schedule that suits your needs, choosing options that balance protection and system efficiency. Our recommendation is to scan your system (at least) once a week at a time when you’re unlikely to notice increased CPU utilization.
- In the Library/Microsoft/Windows/Windows Defender folder, repeat the process for the remaining three services (Windows Defender Cache Maintenance, Windows Defender Cleanup, and Windows Defender Verification).
Include Antimalware Service Executable in the exclusion list of Windows Defender
In its scanning process, Windows Defender inspects every single file on your computer, including its own files. Occasionally, this can cause some interesting interactions and is a common cause of system lag. To prevent this from happening, you can instruct Windows Defender to skip itself when performing a system scan.
- To open Windows Task Manager, press Ctrl + Shift + Esc.
- Find Antimalware Service Executable under Processes. Select Open File Location by right-clicking the process.
- You can see the full path to Antimalware Service Executable in the address bar. Click the address bar and copy the entire path.
- Open the Start menu, enter windows defender, and click the top result to launch the Windows Defender Security Center.
- Select Virus & threat protection, then select Virus & threat protection settings.
- Click “Exclusions” and then “Add or remove exclusions.” You can paste the path to Antimalware Service Executable (MsMpEng.exe) in the address bar by clicking on Add an exclusion, selecting Folder, and clicking next. The folder will now be excluded from the scan as soon as you click Open.
Disable Windows Defender
You may feel tempted to remove Windows Defender altogether if the problem persists after applying the first two fixes. If you do this, you will make yourself vulnerable to a range of cyberattacks. So, you must install a strong anti-malware product on your computer before uninstalling Windows Defender.
By using the Registry Editor, you can disable Windows Defender completely.
- Open the Run dialog box by clicking Windows Key + R.
- The Registry Editor can be opened by typing Regedit in the Run dialog box and clicking OK.
- Navigate to HKEY_LOCAL_MACHINE/SOFTWARE/Policies/Microsoft/Windows Defender by double-clicking the folders on the left.
- Double-click the registry entry named DisableAntiSpyware and set its value to 1.
- If you do not see a registry entry named DisableAntiSpyware, right-click in the main Registry Editor pane and choose New > DWORD (32 bit) Value.
- Name this new registry entry DisableAntiSpyware. To change its value data, double click it and enter 1.
Check for malware infections
It’s possible that something more sinister is causing Windows Defender to stop working. Use a reputable and lightweight anti-malware program such as Emsisoft Anti-Malware (we have a 30-day free trial available) to scan your computer for any threats that might negatively affect its performance.
Windows Defender is a valuable tool, and it’s free with your operating system, but it drains your system’s CPU quite a bit. If you follow the steps described in this article, you can easily get control over Antimalware Service Executable and maintain full computer performance.