

Are you playing games on a Chromebook? And tired of clicking the same objects in a game over and over again. Use an Auto Clicker for Chromebook to automate your game.
Scroll down to know all the features, benefits, and how to enable Auto Clicker for Chromebook.
What is Auto Clicker for Chromebook?
Chromebook introduced the first-ever auto clicker feature to automate and speed up user tasks with ease and comfort. If you have trouble clicking your mouse or touchpad, installing an Auto clicker for Chromebook will undoubtedly ease your concerns about smoothing out your pointer activity.
In addition, it’s pretty helpful in eliminating the problem of unpleasant and cumbersome clicking caused by painful hand movement. We typically spend a significant amount of time working on computers that necessitate the use of a mouse or touchpad.
Auto Clicker for Chromebook Accelerates Identical Tasks
The Chromebook Automatic Clicker is a well-designed feature to moves the mouse cursor automatically whenever it gets still and steady for a specific time. Experience such an automated clicker tool to make your repetitive tasks smoother without continuous clicking effort.
You can get several jobs done quickly, thanks to an auto-clicker that doesn’t require any physical mouse movement. It poses no limitation on how many clicks it takes to complete your tasks.
It ensures that the mouse-clicking tasks are automatic with a constant CPS rate, whenever you are tired of repetitive clicking. You can handle all your tasks, which helps you efficiently manage your tasks with an increasing CPS rate.
To click the mouse faster or hit a keyboard button quickly, a user performs various actions. The speed at which a mouse or keyboard clicks helps you regulate its performance in Clicks Per Second (CPS). It tends to determine how many clicks per second a user can make.
An auto clicker for Chromebook is a brilliant tool that allows you to replace manual clicking with rapid and automatic clicking. On a Chromebook, the technique for turning on the Autoclicker is a little easier. Playing online games, especially gamers, find it quite efficient when they want to respond to gaming sequences with invigorating speed.
It improves the clicking efficiency, avoiding the tiring manual clicking as many times as it requires using the automatic clicker tool.

Auto Clicker Features And Benefits For Chromebook
Some of the uncompromising and promising features will help you understand the performance of the Auto clicker for Chromebook. So, let’s learn a few of them.
Automatic clickers are like an enlivening experience for game lovers. They demand ease for repetitive shooting in the world of Warcraft or building blocks constantly in Minecraft, which requires an efficient and brisk clicking speed. It is even handy in grasping the operational activities of various software program interfaces.
The auto-clicking feature for some random programming interface is a facile and effortless determination of program response. However, the constant, swift movement from one cell to another in the laborious data activity takes the auto clicker differently.
Ranging from various essential operations to copy and paste tasks on Chromebook for comparable data, using an auto clicker makes the users’ tasks easy to operate.
How To Enable Auto Clicker for Chromebook Unblocked
How do you deal with manual clicking when you have a much faster and more efficient pointer auto-clicker? Let’s get started to turn on the built-in Auto clicker for Chromebook.
- Open the settings menu on your Chromebook.
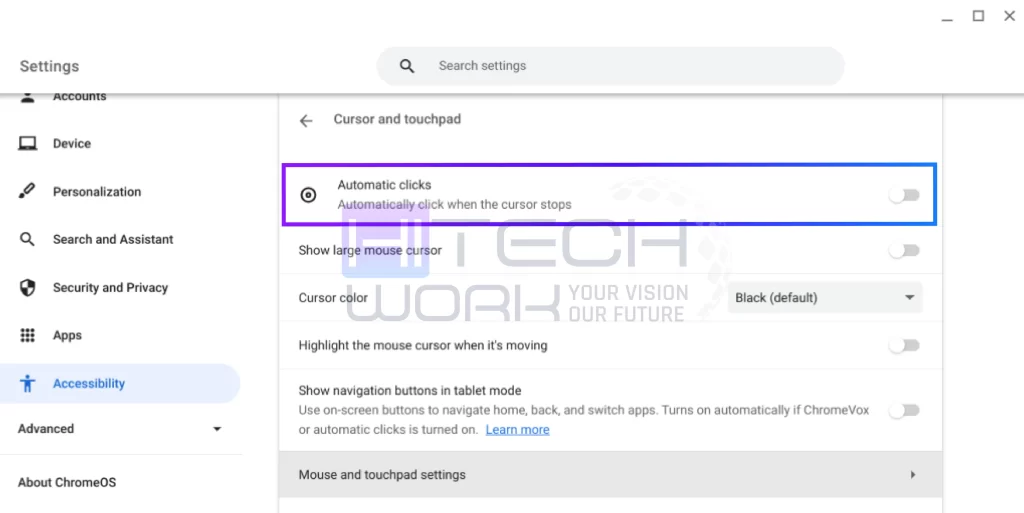
- Head to the accessibility feature that you will see in the sidebar, and click on the cursor and touchpad option.
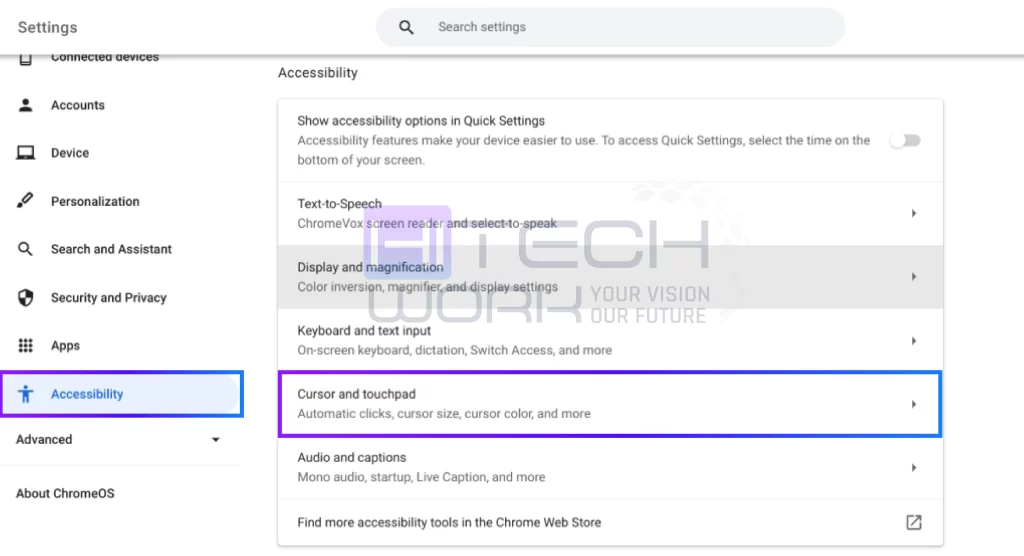
- Turn the cursor on for the automatic clicks option.
How To Customize The Chromebook Auto Clicker Settings
Let’s learn to customize the Chromebook operations if we are willing to optimize the use of the auto-clicker feature. You can even change the settings for automatic clicking whenever the cursor gets into a still position for some time. The user can customize its functions as per requirements. These will be available in the subsequent section.
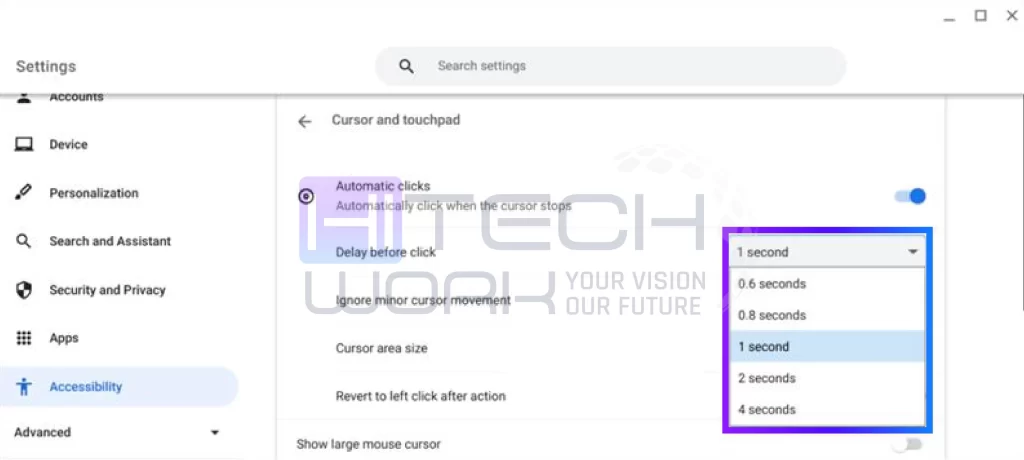
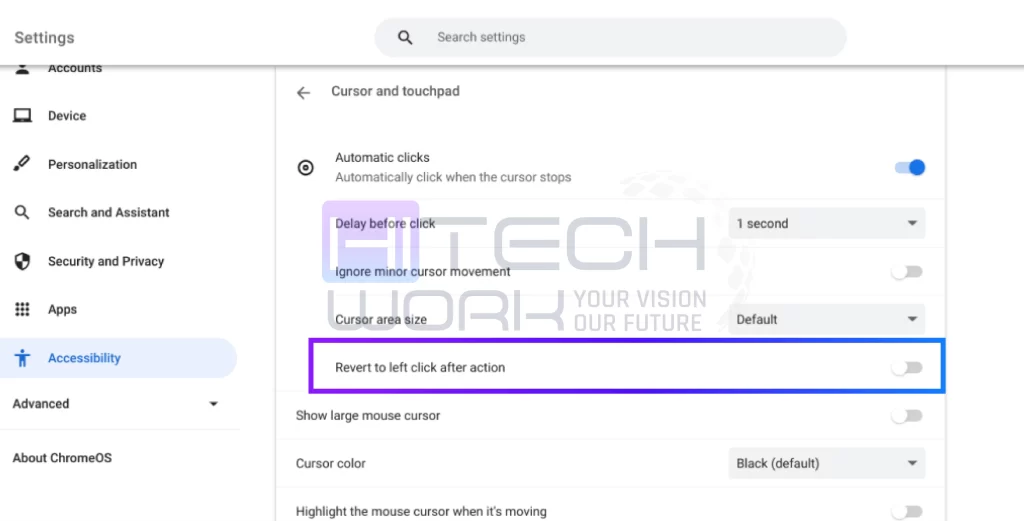
Delay Before Click
The first and foremost option is related to the automatic click whenever your cursor becomes inactive. The amount of delay you want before the cursor remains still in its position depends on the setting you suggest, varying between 0.6 and 4 seconds of delay time.
The auto-clicker will complete the task in the time allotted. To determine the accuracy, you can evaluate the cursor timing from being inactive to start taking on the auto clicker option.
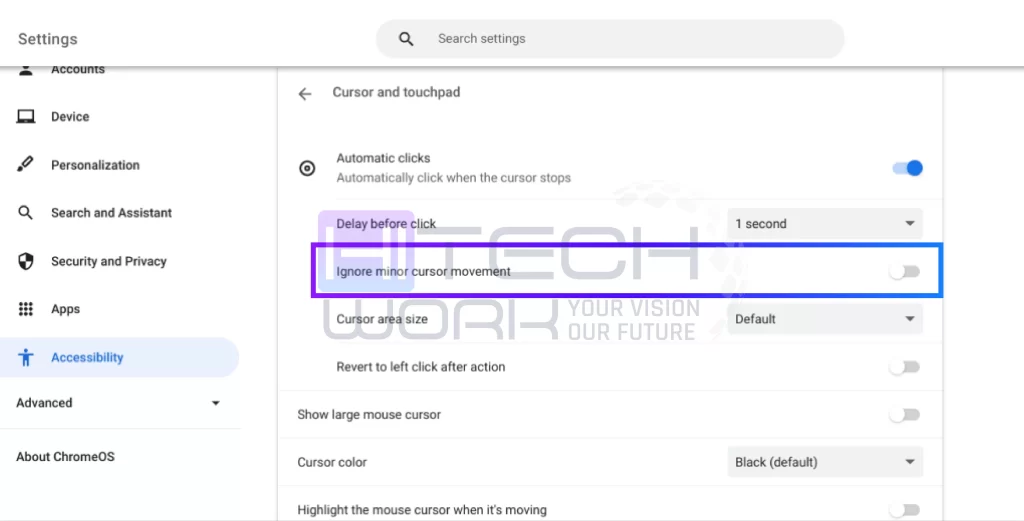
Ignore Minor Cursor Movement
When you turn on Ignore Minor Cursor Movement option, it stops the auto clicker for Chromebook from doing any action when your mouse or cursor makes any minor movements.
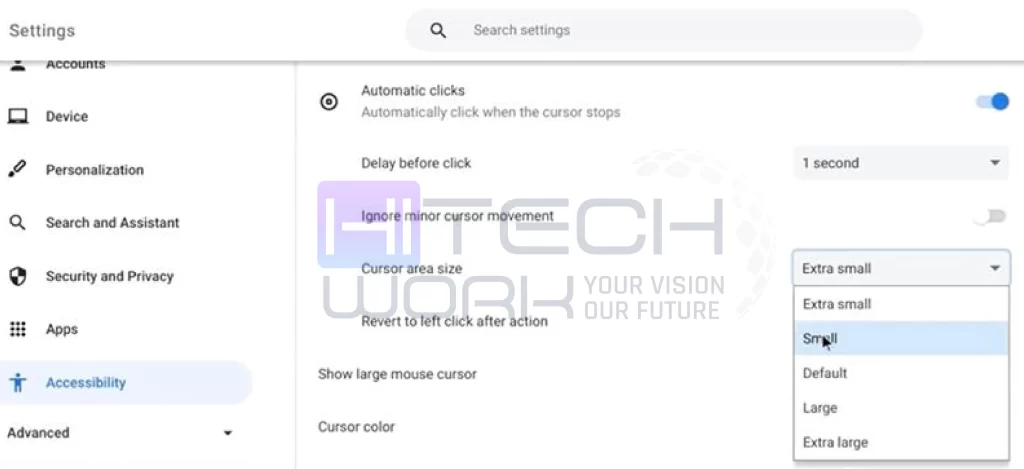
Cursor Area Size
The cursor area size settings allow you to change the cursor ring or area size. To do that:
- Open the drop-down menu of Cursor Area Size.
- Select your preferred cursor area size: Extra small, Small, Default, Large, or Extra-large.
Revert to Left-click After Action
When you turn on the revert to left click after action, toggle the auto-clicker for Chromebook to revert to the left-click option after every action.
Chromebook Autoclicker Menu
Once you turn on the Auto clicker for Chromebook option Automatic Clicks, you will see a menu appear at the bottom left side of your Chromebook. This menu bar has different clicks and actions, which are:
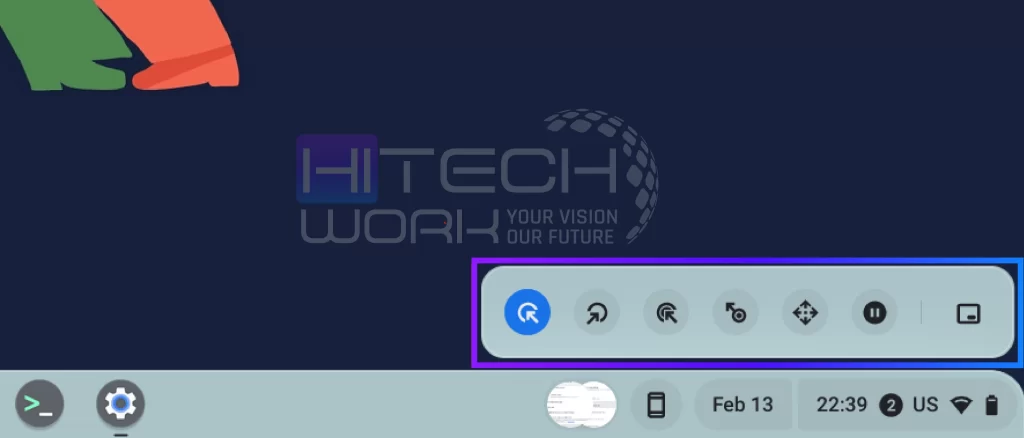
1. Left Click
It looks like left-wing when you select it; it will click left when you point to anything.
2. Right Click
It looks like right wing when you select it, it will open the right-click context menu when the cursor stops moving.
3. Double Click
This option will double-click when you point to an item.
4. Click & Drag
You can select text using the Autoclicker for Chromebook. To do that:
- Select the click and drag option.
- Place your cursor at the beginning of the text.
- Wait for the auto-click delay and move your cursor to the end of the text.
5. Scroll
This option helps you to scroll using the auto clicker for Chromebook. To do that:
- Place your cursor where you want to navigate and wait for the auto-click delay.
- Then move your cursor on the left, right, up, or down arrow keys or scroll options to go to the page.
- Click on the X icon to close the navigation bar.
- Now the auto-clicker returns to the left-click option.
6. Pause
This stops the auto-clicker from doing any action when the cursor stops moving.
7. Toggle Menu Position
It lets you change the place of the Autoclicker menu on your Chromebook.
Third-party Auto Clicker for Chromebook
There are many third-party auto clicker options for Chromebooks. What works best for you depends on what you need it for example, gaming, accessibility, productivity, etc. Here we share the best Auto clicker for Chromebook.
- OP auto clicker
- Autoclicker.io
- GS Auto clicker
FAQs
Do You Get the Chromebook Autoclicker Feature for Free of Cost?
It is a freely accessible tool wherein macros or software are available on almost every web store. An automatic clicker is surely an exciting feature for Chromebook users that costs no service charge.
Why use an auto clicker for games?
Most of the gamers use auto clickers to automate repetitive clicking tasks in games like Clicker Heroes, Cookie Clicker, Roblox, and click speed test. It helps progress faster in games, reduces physical strain, and stops wrist pain.
How do I get auto auto-clicker on my Chromebook?
To get an auto-clicker on your Chromebook, you have to enable the built-in accessibility feature called “automatically click when the mouse cursor stops”. Follow the steps to do this:
- Open Settings on your Chromebook
- Click on to Accessibility option
- Now, find the Mouse and Touchpad and turn on the option for “Automatically click when the mouse cursor stops”.
Here, you can adjust the settings according to your needs.
Is autoclicker illegal?
No, it is not illegal to use an autoclicker, but it is against the terms of service of many online game apps.
Is op Auto Clicker 4.0 a virus?
No, it is not a virus, and claimed as a legit and safe option by the OP Auto Clicker website.
What is the fastest auto clicker for Chromebook?
Fabi.me, OP auto clicker, and auto clicker – super fast are considered high-speed clicking options.
How to use GG auto clicker 1.2 on Chromebook?
- First, you will need to install GG auto clicker 1.2 on Chromebook as a Chrome extension.
- Then open it by clicking the puzzle icon from the browser’s toolbar
- Now press Ctrl +, to start, Ctrl + to stop, and Ctrl + / for the clicks to start.
How to enable Auto-Clicker on Google Chrome?
To enable the Auto-Clicker on Google Chrome, you will first need to install a third-party extension.
What is a cookie clicker?
A cookie clicker is an incremental or idle game where you click on a big cookie to earn cookies, and then use those cookies to buy upgrades that help you get more cookies automatically.
Conclusion
On the Chromebook, gamers or professionals always look for a beneficial way to avoid the awkward, repetitive mouse-clicking operations. In case you make an effortless attempt at essential system operation without sacrificing efficiency, and more straightforward task management. Now, users can look for automation of the mouse-clicking task with an auto clicker for Chromebook.


