

Did you just buy a new iPhone and want to transfer everything from your old device? The iOS Setup Assistant makes it simple to restore your data from another iPhone, iPad, Android phone, or even an Apple Watch backup.
Now it’s so easy to do that, as iOS 18 is released, and with that, Apple has added smoother transfer options and faster setup steps to get you started right away.
In this guide, you’ll learn how to create backups on iPhone, iPad, iPod, Mac, and Android, Transfer Apple Watch data to your new iPhone, and fix issues you may face during setup.
So, let’s get started!
What is iOS Setup Assistant?
The iOS setup assistant is an in-built feature in Apple devices. It helps you to set up your new iPhone and restore the data from your older device. Here are some features that the iOS setup assistant offers.
- Activates your device
- Set up your network settings
- Sets the language and region of your device
- Face ID and Touch ID setup
- Transfer apps and data
- Sign in to Apple ID
- Configure privacy and security settings
What to do Before Using the iOS Setup Assistant
If you are setting up your new iPhone, you must do a little prep work, as it can save you from a lot of annoyance. So, follow these instructions:
- First, charge your new device to make sure the battery will not die in mid-setup.
- Then update your iOS.
- Connect your iPhone to the Strong WIFI network connection.
- Set up your Face ID and Password; if you don’t have one then create a new account to secure your iPhone.

- During setup, you may need the debit or credit card information for Apple Pay.

- if you don’t have storage, the iCloud /Quick Start/ iTunes app will help you make a backup.

- But in the Mac series, there is a slight difference in accessibility features like hearing, vision, cognitive, motor, and system preferences.

- In the Apple Watch, you can access it without an iPhone 6 or later series.

- To back up your Android, follow to Android settings or turn on Google Assistant in Android.
- Make sure your device is not connected to the Airpod, as it can interrupt the setup process.
Method to Setup iOS Assistant Manually
Suppose you have a new iPhone and want to know how to access the iOS setup assistant on your iPhone: here are the steps to do it.
- First, turn on your new iPhone. The iOS setup assistant will automatically start when you start a new device or reset device.
- Swipe up or press the Home button on your iPhone to start.
- If you have an old version of another device that has your data, ensure to tap on Quick Start. Otherwise, you have to do this manually using further steps.
- Activate your device and connect your iPhone to cellular data, Wi-Fi, or iTunes.
- Select your preferred language and region.
- Set up Face ID or Touch ID and a Passcode to secure your iPhone.
- The iOS setup assistant will guide you to signing in with your Apple ID, set up Apple Pay, Siri, Screen Time, Face ID or Touch ID, and other phone settings, and restoring or transferring your data from your previous device.
- Once you set up all the settings and Apple services, tap Get Started.
How to Get Back to iOS Setup Assistant Screen?
We already mentioned how to set up the iPhone Operating System assistant for the first time, but what if you have made any mistakes during the setup? And how can you change easily? For this purpose, I have this section to get back to the iOS setup assistant screen.
Note: Getting back to the iPhone Operating System setup assistant means resetting an iPhone. Except for this, you don’t have any other method to get back to your iPhone setup assistant screen.
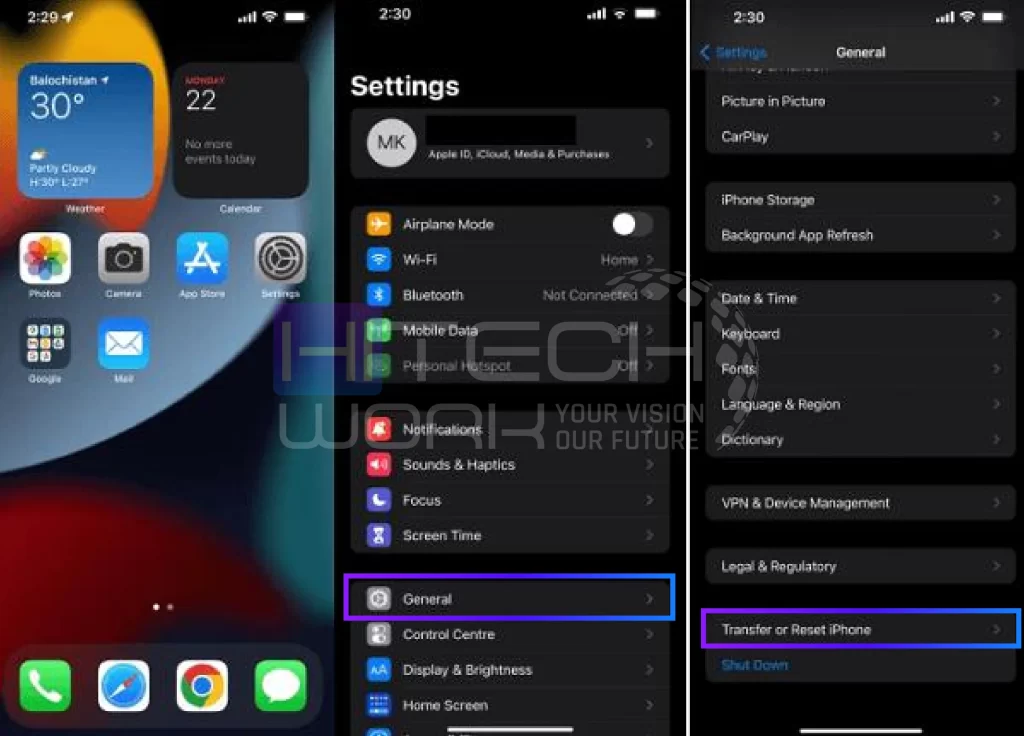
- First, you have to access the iPhone settings from the home screen. Next, simply open the settings page.
- Now, locate and click on the general tab.
- Tap transfer or reset iPhone and select erase all content and settings.
| Disclaimer: Using this method will wipe out all your data. You have to prompt to proceed through the iPhone Operating System setup screen again and select restore from iTunes backups when given a choice. Make sure your phone is connected to a stronger internet connection while restoring your backups. |
How to Transfer/Restore Data in iOS Setup Assistant from iOS/Android/Apple Watch?
Every device has some methods to make it process. Use according to your preferences. You can use a wire connection between 2 iOS devices and follow the instructions to transfer data.
Another method is to connect it wirelessly by placing 2 iOS devices near each other to transfer your data. So, there are a few steps to restore and save your iPhone operating system data and device, which are explained in the next section.
Restore Data (iOS to iOS)

- Press and hold the Power button first on your iOS, depending on your model, until the Apple logo appears on your screen.
- After turning it on, the HELLO word will display in a different language.
- Choose your language by sliding anywhere from left to right.
- Now select your country.
- Once you select the country, proceed to a new step by choosing “WIFI or Cellular connection.”
- A new screen will appear to enable “Location.” It’s up to you to enable or not your location.
- Now it’s time to back up your data from iCloud/ iTunes /QuickStart.
- Finally, you can sign in with your Apple ID; create an Apple ID if you don’t have an account.
- To agree with the terms and conditions, click “Agree.” Otherwise, choose the “Send by Email” option for later.
- Use the “Find My iPhone” option from the iCloud account.
- On your device, set up iMessage and FaceTime, Touch ID for fingerprint, or Apple ID password to place your Passcode.
- To secure your data, you need to use a Passcode; you don’t need to click the “Don’t Add Passcode” option.
- Set iCloud Keychain for your device, whether by using iCloud security code.
- You can use “Siri” to help access the iPhone by asking anything in your voice.
- With app developers, allow Apple to share “App Analytics data”
- Choose the view of your iPhone from Standard and Zoom, which makes it convenient to view icons, text, and controls.
- Have fun! Your iPhone is ready to use.
Restore Data (Android to iOS)

- First, set up your iPhone Operating System settings to restore data in the iOS setup assistant.
- Tap the option “Move Data from Android.”
- Select the “Move to iOS” option if it appears on your Android.
- Otherwise, download the app from the Google Play Store to move to the iPhone Operating System.
- Tap “Continue” on Android and iOS.
- Click the “Agree” and “Next” options on your Android.
- Enter the code in your Android or iOS device.
- With the peer-to-peer connection of WIFI, you can easily transfer the data now after entering the code.
- Transfer data from your Google account to your new Apple device.
- After transferring data, click on “Continue Setting Up iOS.”
- Then sign in with “Apple ID“ or log in to your existing account.
- Now, you can access your iOS.
Restore Data (Apple Watch)

- Turn on Bluetooth on your iPhone. Keep your devices close until the process ends.
- Press and hold the side button of your Apple Watch until the Apple logo appears.
- Wait for a while, and pair your devices.
- A message of “Use your iPhone to set up this Apple Watch” will appear on your iPhone. Click “Continue”.
- Place the iPhone in front of the animation of the watch. Then, pair it manually by following the instructions.
- Press the “Restore from Backup”
- Now, sign in with your Apple ID and password for further proceedings.
- Turn on Find My, Location, WIFI, Diagnostic, Route tracking, and Siri features, as well as the text size of your watch.
- Create a Passcode for Apple Pay; otherwise, skip this step.
- In the end, install compatible apps for your Apple Watch.
- While syncing the Apple watch, wait until the “Digital Crown”. Press it.
- Use your Apple Watch normally.
Conclusion
Hopefully, the above step-by-step method might help you transfer your data from iOS devices or Android devices by using the iOS setup assistant function. However, you can use third-party apps for data management and transfer tools like imobie, Ultfone, Tenoshare, and others to transfer from your old phone to the new one. Well, if all this information is not worthwhile, then you can also contact Apple for assistance.
FAQ’s
What is the iOS setup assistant?
An iOS setup assistant is software for iOS devices. It will guide you throughout the setup process.
How to get to the iOS setup assistant?
The following steps will guide you on getting an iPhone Operating System setup assistant.
- Go to the settings icon, find the General option, and tap on it.
- Then, reset and tap erase all content, including settings.
- Now, this step will bring you back to the setup assistant.
How do you use an iOS assistant?
- Open the Google Assistant app on your iPhone or iPad.
- Choose an option: Say “OK Google” or “Hey Google” Tap Speak.
- Now, you can ask a question or give a command.
Why is the iOS setup assistant not working?
Due to network problems, storage issues, and transfer interruptions Move to iOS function is not able to work properly.
How long should Move to iOS take?
Moving to iOS takes up to 10 to 20 minutes to move the data from your Android to your iOS device.
Can I skip the iOS setup assistant?
Yes. You can skip IOS Setup Assistant settings for all your Apple devices by using a device management service and Apple School or Business Manager.
What is the iOS setup assistant code?
There is no iOS setup assistant code. However, a six-digit pairing code will appear on your iOS device during initial setup. You can use this code with Apple Configurator to automate the process.
Why is my iPhone stuck on Setup Assistant?
Your iPhone is stuck on Setup Assistant because of:
- Temporary software glitch
- Poor network connection
- Backup or update process issues
To fix it, make sure your iPhone has an internet connection, restart your device, and try setting up the phone again.


